|
AMATEUR OBSERVATORIES:
DESIGN AND CONSTRUCTION
THE PARKHURST OBSERVATORY
by Hugh Lund
Many years ago I built a garden observatory using a roll-off
roof. When we moved to Parkhurst
I intended to do something similar but unfortunately our new
property was much smaller so there
was just no room for such a design. The Newtonian has to be
pivoted rather low down if the eye-
piece is to be within easy reach when pointed to-wards the
zenith. This presents a problem to the
design of a small observatory.
This is shown diagrammatically in the two figures below :-
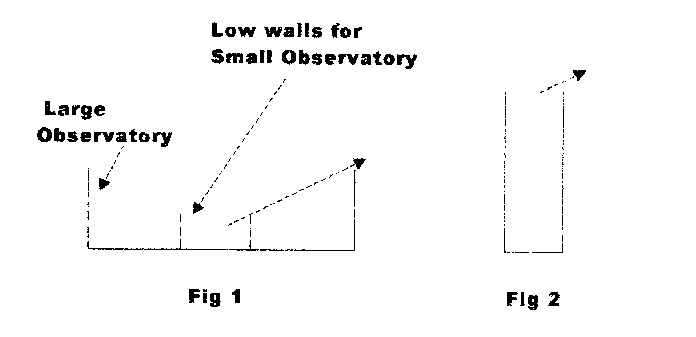
In Figs 1 and 2, the vertical lines represent the walls of the
observatories. In Fig 1, a Newtonian
line of sight is shown (dotted arrow pointing about 30 degrees
above horizon) with the very low
walls necessary to achieve this elevation whilst a Refractor or
Cassegrain shown in Fig 2 can have
very much higher walls for the same altitude with obvious better
protection for the observer. At
risk of belabouring the point, from Fig 1 it may be seen that the
smaller the observatory the lower
the walls have to be for the same pointing angle.
With this in mind I prepared the following Specification :-
- Small enough to fit the site yet accommodate the
Newtonian. ( This meant that the upper
part of the walls would have to fold down.)
- Give a view through the telescope of 30° above the
horizon. ( For the chosen sight this
meant that the base of the telescope had to be
raised by at least 1.5 m )
- Reasonably fast opening and closing times ( less than one
minute ).
- Give some protection against wind where possible.
- Have sufficient head - room when closed so that I can move
around inside.
- Have a degree of dust protection and insulation against heat
when closed.
The present design more or less meets these requirements.
Construction
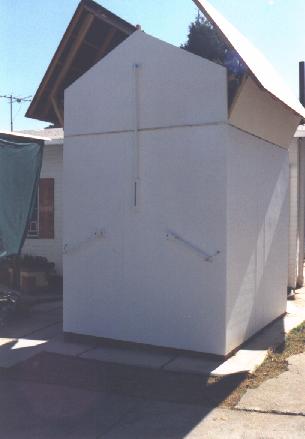
| The observatory, which is mainly wood,
rests on a low brick plinth measuring 2 by 2.5 m. I used
standard house size foundations for all the
brick-work. A central brick column measuring 1.4 by
0.8 m and 1.6 m high carries a concrete slab on which is
mounted the base of the Telescope. The inside of
this column is filled with dry sand thus reducing
vibration and adding mass. Plastic sheeting is used
extensively to prevent damp reaching the
interior floor of the building and the bottom of the
wooden frame. Level with the top of the column is
the observatory wood plank floor covered with felt
floor tiles. The brick column is not isolated in
any way from this floor which has led to a strong design.
No ill effects from vibration have been noticed, probably
because I stand still during the critical times. |
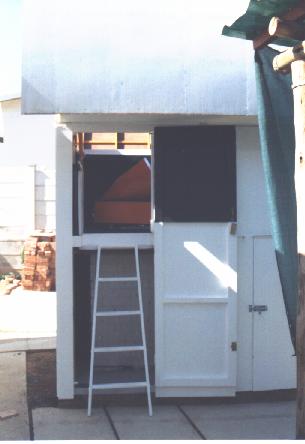 |
The walls of the observatory are clad with Everite
ceiling board. This board has some insulation
properties but is somewhat porous so must be water-proofed with a
coat of enamel paint ( PVA
first ). The roof and upper wall sections are of Tempered
Masonite screwed and glued to a light
wooden frame as can be seen in the photograph. There are two of
these each hinged to the top
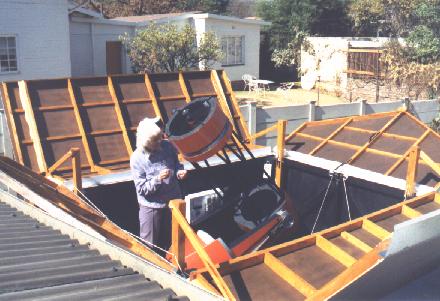
of the long walls of the main building frame. The
end gables are also hinged so that they can be
folded outwards when needed to give a 30 deg horizon.
Galvanized flashing along the top ridge
of the roof prevents the entry of rain but allows a degree of
ventilation. Foam strip in various
forms is used to reduce the entry of dust.
The observatory is opened by means of two crank handles which
are connected separately to each
half of the roof by means of cables and levers. A means is
provided to hold the roof at more or
less any angle between closed and fully open. If I am
viewing the sky to the west I can close the
east side if necessary thus providing some protection from wind.
Equipment
Back in 1981 (when R1 translated into $1.38 believe it or not)
I acquired a Meade 12.5" mirror.
At the time most of the designs for even quite large telescopes
were portable or so it seemed from
Sky & Telescope so not knowing what I really wanted, I
followed suit. To keep weight down
I used polystyrene and glass fibre to built most of the
telescope.
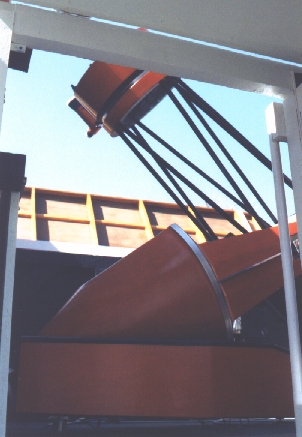 |
The fork - cone design
concept is from Porter ( he used concrete ) who was
involved in the design of the 200" at Mt
Palomar. The base upon which the cone sits is of
wood. The rim of the cone is driven by friction
drive from a geared down synchronous motor. Coupled into
the gearbox is a stepper motor which provides three slew
rates - medium, slow and very slow. Another stepper motor
driving a tangent arm does the same for
declination. For high speed slewing I simply
pull the 'scope to where its needed. Shaft
Encoders pick up RA and declination motion. Pulses from
these two units are converted and shown on a red LED
numeric display unit mounted in the corner of the
Observatory. An old stripped down '283 computer
does the number crunching. RA is displayed to the nearest
10 sec of time and
|
declination to the nearest arc minute. In practice of course
this accuracy is not achieved but I am
reasonably happy with the results. I do not have a finder
telescope but use open sights to set up
the system on a bright star and then go from there.
My pride and joy is the Co/k Book Camera. This CCD
camera is designed to be built by just
about anyone. Its looks count against it when compared with
say the S-Big series but like the
Dakota aeroplane it performs very well. The camera is
permanently mounted on a two position
slider - to select eyepiece or camera. Focus is fixed but
adjustable using special ring spanners.
I get away with this I think because of the use of glass fibre in
the telescope tube. Small
adjustments are made twice a year for summer and winter.
The camera is equipped with a
Johnson V (visual) filter which allows me to do photometric
measurements. An old '386 runs the
software for the camera and stores the images on an elderly 90 MB
hard drive. I download these
via an ethernet link to the main house where I use a '486 for
image processing. In a recent session
lasting 6 hours over 380 files were generated taking
up about 24 MB of disk space. To transfer
this lot by stiffy would take forever. Processing software
is especially written for the camera and
works well considering the price. The camera produces Fits
format which is the standard for
astronomical image transfer so any commercial astronomical image
processing software can be
used.
Use
There is no doubt that a functioning observatory
greatly enhances the output and pleasure of the
average Amateur who is engaged in work of some scientific value
or just enjoys viewing the
heavens. It does not have to be as complex as the one described
above in fact the simpler the
better. I think that the important part is that it should
be a pleasure to use.
|