The Elusive SCP
A comprehensive guide to finding the precise South Celestial Pole
"drill hole"
By Dave Gordon
We in the Southern Hemisphere have traditionally felt a little disadvantaged at not having our own "Polaris" with which to align our telescopes. Owners of computerised "goto" telescopes are not ordinarily faced with the daunting task of aligning to the SCP. For the rest of us, an approximate SCP alignment is sufficient for ordinary observational purposes. However, it is critical to align perfectly to the SCP prior to attempting any long-exposure astrophotography. An added bonus of a perfect alignment is the opportunity to use the setting circles to locate objects, with outstanding accuracy.
The star drift method is much too cumbersome and time consuming. Most guides refer the observer to the very shy magnitude 5.5 sigma Octantis. With practice, a dark sky observer can become quite adept at hunting down its position, however city dwellers are faced with many wasted and precious minutes of observing time waving binoculars in the general direction of Octans, trying desperately to locate a faint beacon buried amongst many other faint beacons, wishing that sigma Octantis had a big neon sign that screamed "POINT HERE".
Forget about sigma Octantis as a stand alone item and concentrate on the shapes close to the SCP. This is the key to a fast and accurate alignment.
There are 5 distinct stages to a perfect SCP alignment:
Naked Eye Confirmation
The objective is to find the approximate SCP so that the telescope can initially be positioned in a rough SCP alignment. Familiarise yourself with the constellations immediately surrounding the SCP. The best pointers we have to the approximate SCP are:
These can be used for approximate alignment at different times of the year. For example, on the 15 October, Crux and the pointers are of no use, so we apply the alignment of Triangulum Australe with Apus to extrapolate onto the approximate SCP position. Refer to Chart A below:

Chart A, 80° FOV, 15 October 19h30 SAST, 26° south, north is up west is right
This is an 80 degree field of view, similar to a naked eye view looking southwards. Find Triangulum Australe and specifically alpha Trianguli Australis, or Atria. Now find the right-angled triangle forming the head of Apus, specifically: beta, gamma and delta Apodis. The line drawn from Atria to the right angled triangle must be extended its own length again, and the result will be the approximate SCP.
Binocular Familiarisation
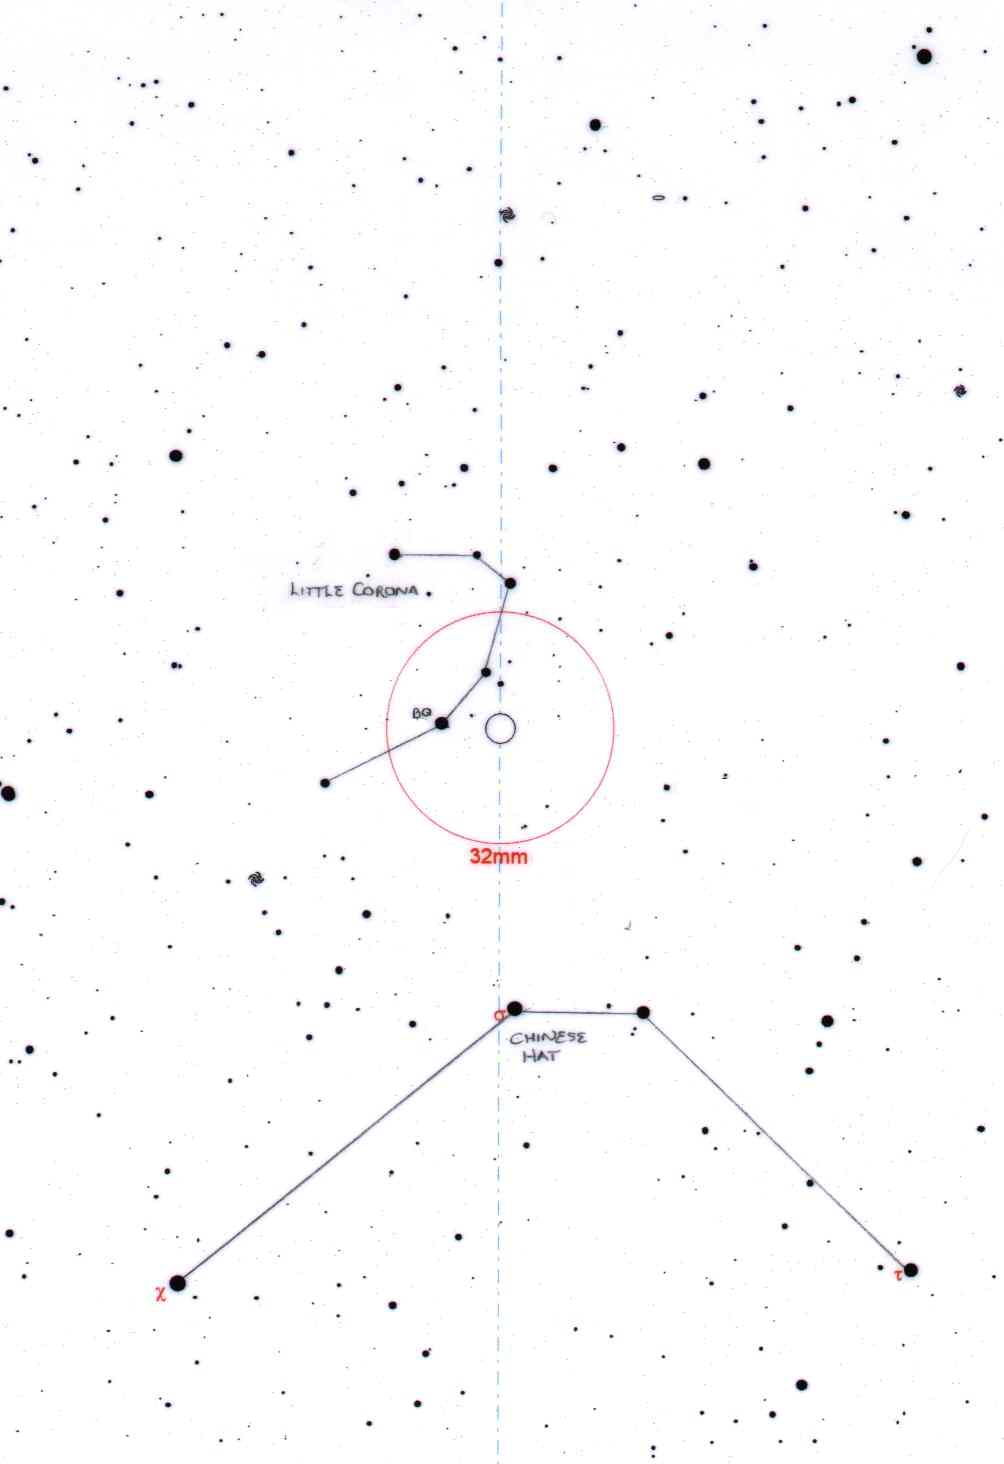
Now it is important to get an optically aided view of the SCP region that you have just visually identified. I use 10x50 binoculars but any will do. You are looking for two shapes; We shall name them the Chinese Hat and Little Corona. Start with a familiar shape in the binocular view and then slowly work your way towards the approximate SCP. Make sure you can find these two shapes in binoculars first. It is much more difficult to start with the finder scope if these are not yet familiar shapes. Refer to Chart B below.

Chart B, Octans in the region of sigma Octantis, 5° FOV,
You will see both the Chinese Hat and Little Corona in the same field of view, only Little Corona is much fainter but distinctive in shape. Sigma Octantis is the brighter star at the top of the Chinese Hat. It is our guide star used to draw a line to Little Corona, and the point we are chasing. Alternate with a naked-eye and binocular view to memorise your altitude (angle from the horizon). Remember, the position of the Chinese Hat around the SCP depends on the current time. You will become familiar with it in any orientation.
Scope Positioning and Levelling
Switch off all motorised drives for the duration of the alignment. Position the scope as accurately as possible with respect to the altitude and position that you memorised visually and with binoculars earlier. Level the scope with a GOOD spirit level. This is important. If you gain a perfect SCP alignment but your scope is not level, tracking will not be accurate. When the scope is level, perform the following steps:
Finder Scope Adjustments
Your wedge should allow you to make fine adjustments in azimuth. Loosen the screws that attach the wedge to the tripod mount so that your can make certain fine azimuth adjustments. You will also be making fine declination adjustments, but this is easily achieved with the declination adjuster knob.
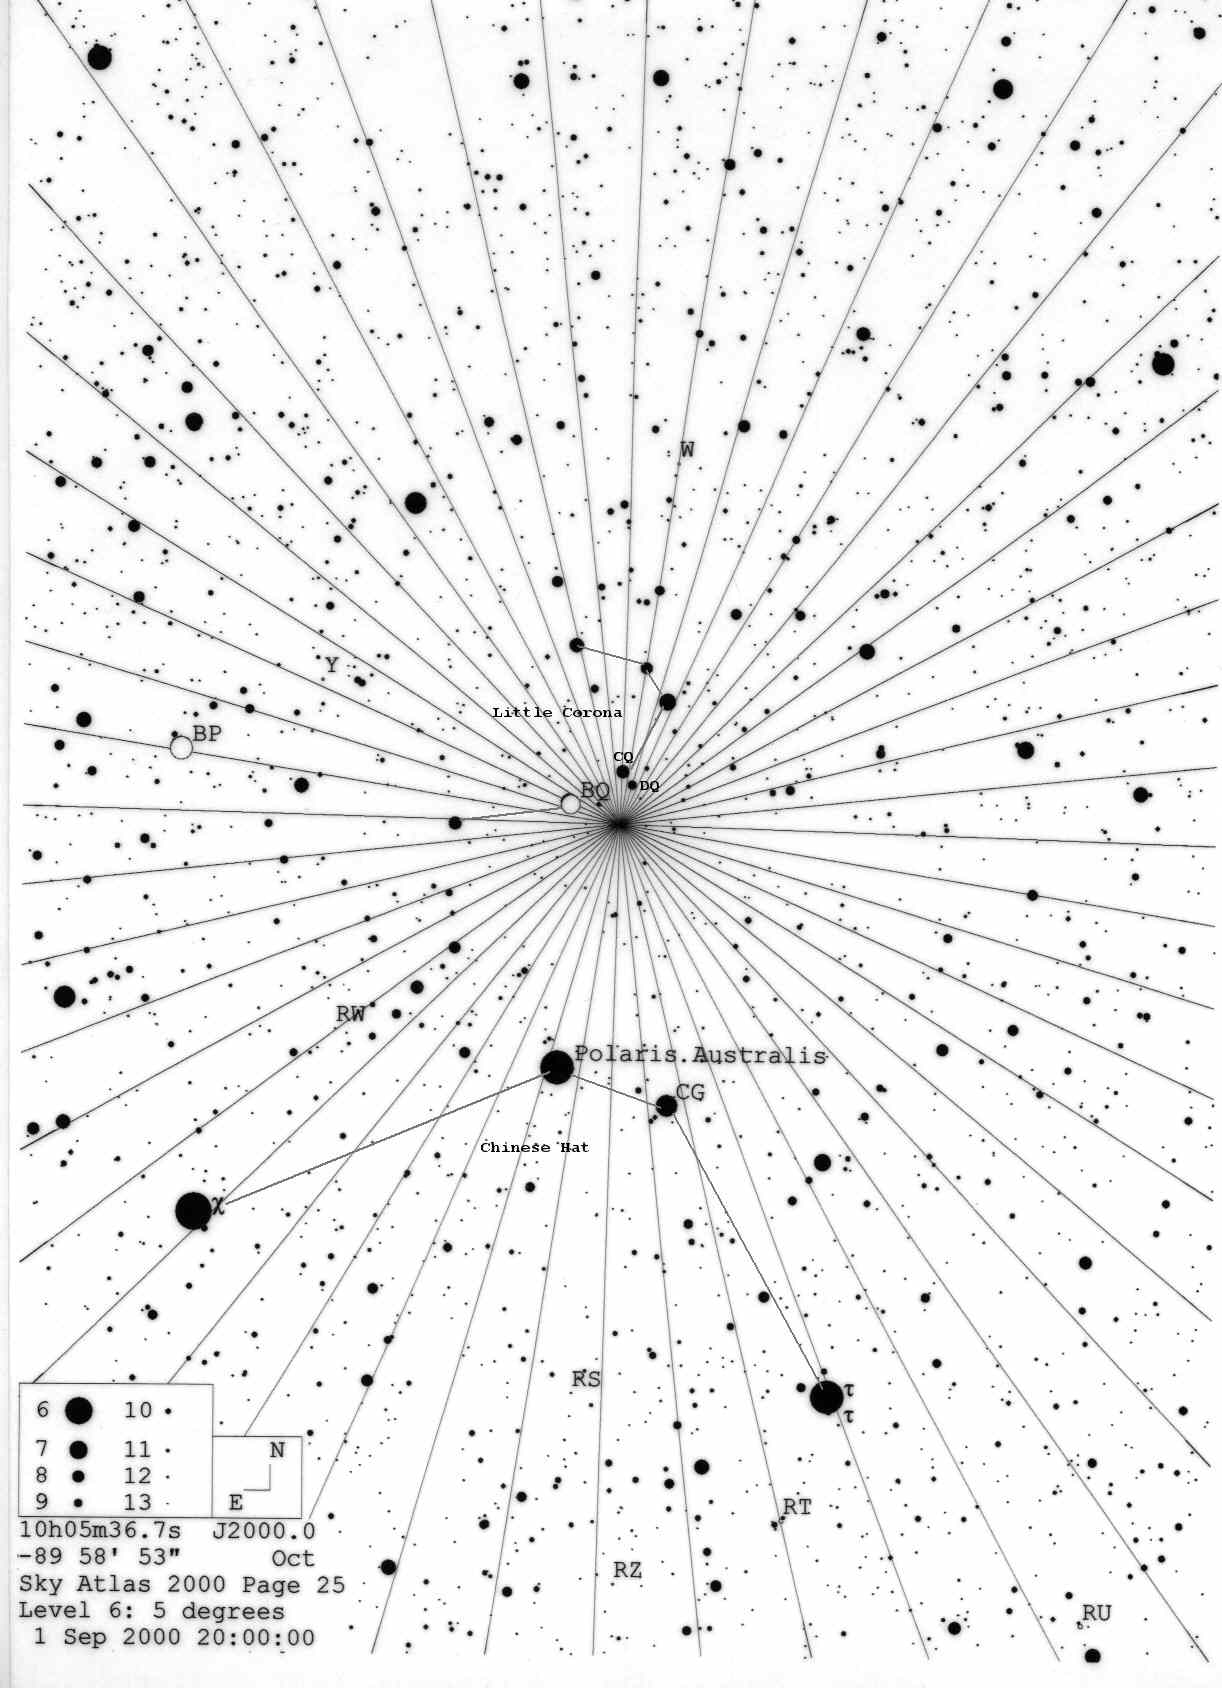
Look through the finder scope. Once again, you are looking for the Chinese Hat and Little Corona. They should be in the same field of view (as in an 8x50 or similar finder scope). Refer again to Chart B. Bear in mind that their orientation will be reversed in comparison with the binocular view. Chart C is a more detailed view for a dark observing site.

Chart C, Octans in the region of sigma Octantis, 5° FOV,
You can now see the goal point – the drill hole of the SCP. Draw an imaginary line up from sigma Octantis, also marked as Polaris Australis on Chart C, towards the star marked BQ in Little Corona. BQ forms a perfect right-angled triangle with two other stars of similar brightness in close proximity. On Chart C and D, they are marked CQ and DQ. The three stars in the triangle are magnitude 6.6, 7.8 and 9.7 respectively. Align the cross hairs of your finder scope on that region of Little Corona.
Micro-adjustments in a low-magnification eyepiece
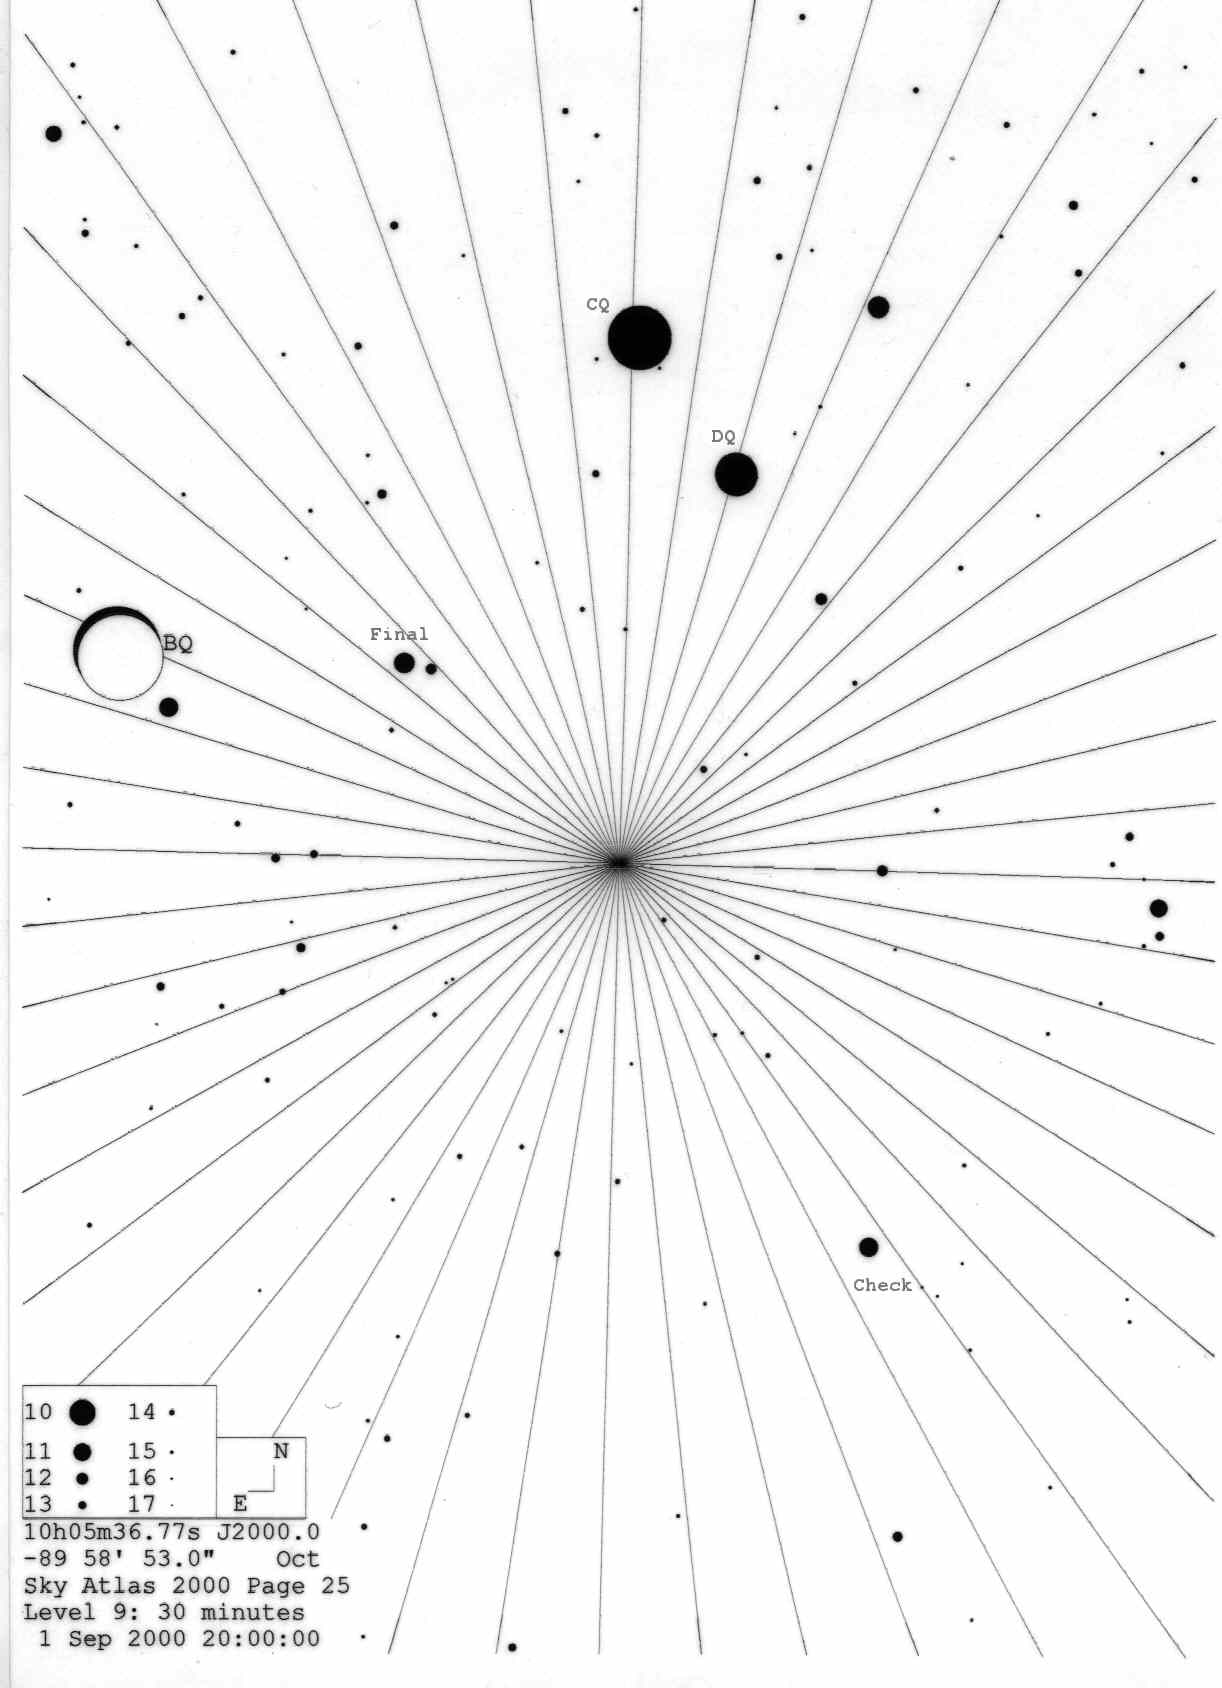
It is the right-angled triangle of BQ, CQ and DQ that is the target field of view in your lowest magnification eyepiece. I use a 32mm wide angle (78x) for this purpose. I suggest no higher than 100x magnification (50 – 80x is ideal). Refer to Chart D.

Chart D, 30 Minutes FOV,
Chart D has a field of view of 30 arc minutes. Make sure you have the right-angled triangle in the field of view. Now, on the hypotenuse, there are two close faint stars that I have collectively marked Final. They are faint at magnitude 11 but I can see them, even from a heavily light polluted Randburg. Now, form a perfect isosceles triangle with DQ as the apex. The star labelled Final and the SCP form the base of the triangle. As a confirmation and final check, there is another star I have marked Check (12th magnitude). The SCP lies precisely at 30% of the distance from Final to Check. Centre the SCP in your eyepiece.
Reconfirm that your scope is still level then tighten all wedge and tripod adjustment bolts. You have a perfect SCP alignment. All that remains is to calibrate your setting circles.
Directly after alignment, confirm that the declination circle reads -90°. Switch on the tracking motor and find a bright star of known co-ordinates in the eyepiece. Set the RA circle to the correct co-ordinate and confirm the declination on the declination circles.
Devote an observing evening to this exercise and practice it. The entire exercise from start to finish will eventually take you only 5 – 10 minutes.
As a test one evening, I placed the barred spiral galaxy M83 in the eyepiece and left the tracking motor running. When I returned 90 minutes later, M83 remained perfectly centred.
Acknowledgements
With special thanks and appreciation to Dino Fotinidis
Questions and Suggestions
E-mail your questions or ideas to Dave Gordon at skyowls@hotmail.com